Now updated to include all the Exceptions!
Bagai’s Replies:
|
| Naturals: | 31, 42, 53, 61, 65 | |
| Ace-X: | 21, 41, 51 | Slot or Split? |
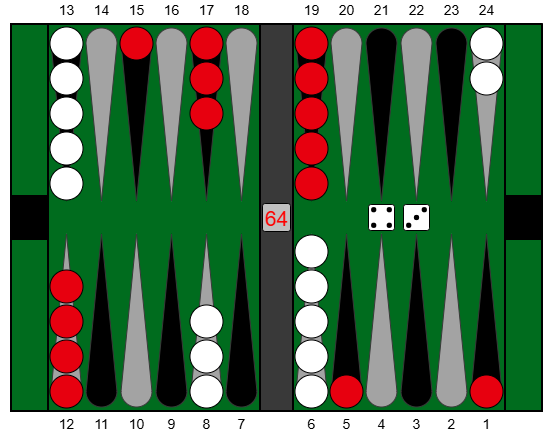
| Six-X: | 62, 63, 64 | Run or Split? (Or point?) |
| Others: | 32, 43, 52, 54 | Down or Split? |
The Naturals point to a clear play, at least on the opening roll. The other groups each pose a question. These questions apply equally well to the first and second roll, and it’s worth considering why the answers might differ:
One reason is that the risk-to-reward ratio may change depending on the opening roll. For example, while slotting is the best play for an opening 21, it’s too risky in reply to an opening 41 split (41S) since there the slot would be exposed to a double shot. So rules for opening replies are often based on the opening play, such as “Slot aces after Opener has slot or played down, otherwise split.”
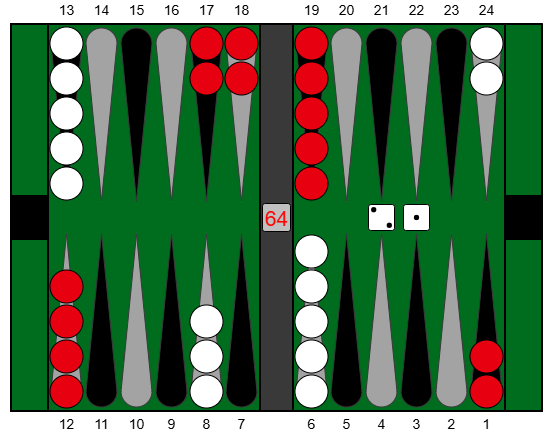
Another reason is that occasionally the best opening play is blocked. You can’t split a 41 after an opening 64P since the 23 point is occupied. So rules for opening replies often give alternatives when default plays are illegal, such as “Slot aces if splitting is blocked by an opening 64P.”
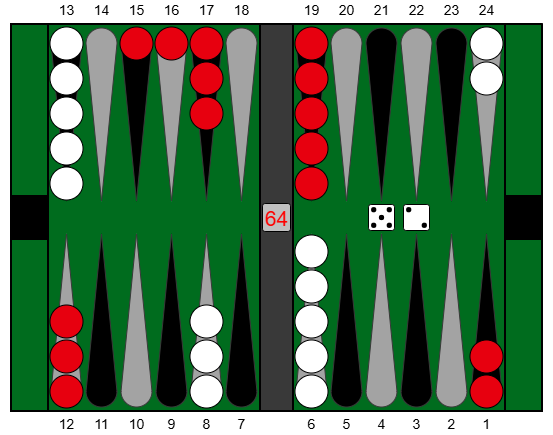
The final reason is a big one. Sometimes the reply is different because there are blots to be hit. Hitting is usually a great idea, but not all blots are created equal and occasionally the alternative to hitting is a great play itself. How to prioritize? Which goals are trumped by hitting, and by what kind of hitting? Even players who know the openings pretty well may not be able to answer this question in the abstract. Knowing each data point doesn’t guarantee awareness of patterns within the data – if such patterns even exist.
I certainly didn’t know if any such patterns existed when I began this study, and I was also pretty fuzzy on a number of the data points. So imagine my surprise upon discovering this question has a clear answer, one that I had never before seen in print. If I have missed an earlier formulation please let me know and I’ll be happy to cite it. But until such time, I name this particular piece of backgammon wisdom . . .
Bagai’s Replies Surprise:
For non-doubles replies, hitting any blot outside your inner board takes priority over anything else. Hitting loose on your 5 and 4 points takes priority over everything remaining except for playing your Naturals.
Or, phrased as a set of prioritized rules:
- Hit any blot outside your inner board.
- Play your Naturals.
- Hit loose on your 5 and 4 points.
- Rule for Ace-X,
- Rule for Six-X.
- Rule for Others
(These last three are mutually exclusive, so priority is irrelevant.)
These are the six main rules for Non-Doubles Replies. There are two groups of exceptions to this ordering that are covered as sub-rules. (Can you think of them? Forgo hitting on your bar to make your 5 point, and forgo making your 3 point in order to hit loose on your 5 point.) These sub-rules will be covered in detail below. That there are only two of them demonstrates that this prioritization is best by far for minimizing exceptions. It’s also a great way to introduce the replies to a beginner.
Doubles
Since there are fewer Doubles to cover, their organization is simpler: one rule per Double. Each rule describes the default way to play the Double, along with how that play changes depending on the opening roll.
Sub-Rules
As mentioned above, the first Non-Double rule is “Hit any blot outside your home board.” Notice, however, that this rule may not specify how to play the full roll. Consider 62S 41. The ace is 8/7*, but what about the 4? We need a sub-rule to specify.
In this case the sub-rule is: “Along with a direct hit from the 24 or 8 points, play the other checker from the Mid. Along with a direct hit from the Mid, play the other checker from the 24 point.” Note how this sub-rule encompasses Stick’s rule quoted above. Many of Stick’s rules found their way into this system.
Most sub-rules are clarifications like the one above. But some sub-rules are groups of exceptions. For example, another sub-rule is “Forgo hitting on your Bar to make your 5 point. (62S, 63S, 64S) 31: 8/5 6/5.” I could have just added those three positions to the list of exceptions, but whenever a set of exceptions followed a clear pattern I preferred to create a sub-rule.
If you already know your openings you may have spotted that hitting with 8/7* 24/21 (and not 8/7* 13/10 as the prior sub-rule would indicate) is actually slightly better than pointing in reply to 64S. True enough but the difference is well under .01, making the play a substitution. I judged that a sub-rule with one substitution was preferable to three exceptions. There were many such judgment calls, which I tried to resolve by minimizing exceptions without worrying over substitutions.
The final tally: 12 rules (26 sub-rules), 568 best plays, 36 substitutions, and only 26 exceptions.
Learn the twelve rules and you’ll have a good overview of opening replies. Learn the twenty-six sub-rules and you’ll make far fewer mistakes than the average open-level player. Memorize the twenty-six exceptions, and you’ll make no errors greater than .01. It’s not that hard to do. That’s the promise of this system.
The Rules
All twelve rules and twenty-six sub-rules are defined here, with many supporting examples. Summary tables are provided in the Appendix for easy reference.
Non-Doubles
1. Hit Outside: Hit any blot outside your home board.
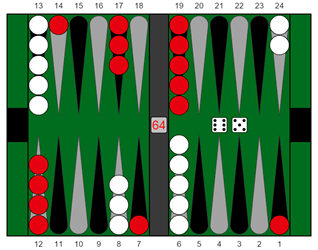
This rule takes priority over all else. There are thirty-four cases where this rule determines the entire play, such as Position 1 (43D 54). There’s only one way to hit: 24/15*. There are no exceptions or substitutions to this rule. However, there are occasions where you have a choice of blot to hit. The first sub-rule clarifies those cases:
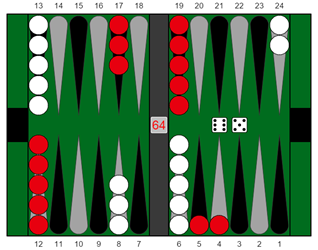
1A. Hit in the outfield rather than on your Bar. 62S 64; 63S 63; 64S 62.
These hits gain more in the race and expose you to fewer return shots. See Position 2 (63S 63).

Position 1. 43D 54: 24/15*

Position 2. 63S 63: 24/15*
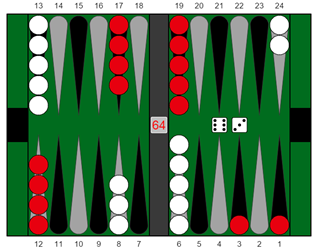
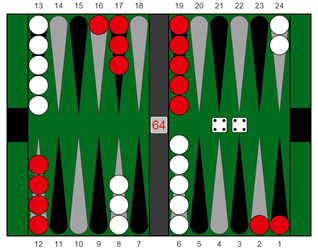
1B. Along with a direct hit from the 24 or 8 points, play the other checker from the Mid. Along with a direct hit from the Mid, play the other checker from the 24 point.This covers what to do with the other checker after a direct hit. The strategic concept is diversification – with Opener in the air you want to cover all quadrants. If you’ve hit from the rear, bring a checker down. If you’ve played off the mid, split from the rear. On the tactical side, after 8/7* your 8 point is stripped which means that subsequent hits or covers might require breaking it. You don’t want that, so bring a checker down from the mid to assist. See Position 3 (63S 21). Rule 1B covers forty-six cases plus two substitutions and one exception. Position 4 (64S 41) shows an example of a substitution. The rule would suggest 8/7* followed by 13/9. In fact, the best play is 24/20 8/7*, but 13/9 is only .0057 behind, not enough to worry about. (Of course if you want to learn all the correct replies, no one is stopping you. All the data are available within FlashBack.) |

Position 3. 63S 21: 13/11 8/7*

Position 4. 64S 41: 24/20 8/7*
|
The sole exception to Rule 1B is shown in Position 5 (41$ 43). The rule would suggest 24/20* followed by 13/10, but the best play is the unusual 24/20* 24/21. This time the difference is significant: .018. You don’t want to give up that much equity (remember, our cut off is .01). So 41$ 43 goes into our list of exceptions, for subsequent memorization. We’ll look at how to use FlashBack to memorize the exceptions in the last section of this paper. Rule 1B also has two sub-rules of its own, each covering a set of well-known special cases: 1Bi. When hitting with 24/20*, play your remaining 6 by continuing to the 14 point. (21$, 41$, 51$, 62$) 64: 24/20*/141Bii. After Opener splits with 6x, play your 65 by hitting on your Bar and Ace points. (62S, 63S, 64S) 65: 13/7* 6/1*After hitting on the 20 point, play your remaining 6 with the same checker rather than expose a direct shot on your Bar, as in Position 6 (51$ 64). And, after hitting on your Bar with 13/7*, play your remaining 5 by attacking on your ace point, as in Position 7 (62S 65). Avoid the common overplay of hitting twice with 51 in reply to 6-X. That play can be correct at Gammon Go, but never for money. Stripping the 8 point is too much of a liability. Instead, just follow rule 1B: Along with a direct hit from the 8 point, play the other checker from the Mid, as in Position 8 (63S 51). |

Position 5. 41$ 43: 24/20* 24/21

Position 6. 51$ 64: 24/20*/14
Position 7. 62S 65: 13/7* 6/1*

Position 8. 63S 51: 13/7*
1C. Forgo hitting on your Bar to make your 5 point. (62S, 63S, 64S) 31: 8/5 6/5The five point is the five point. 2. Naturals: 31, 42, 53, 61, 65. (If blocked: 61P 65: 13/7 13/8.)Make these strong plays when you can (unless you can hit outside, as described above). The only one that can be blocked on the second roll is 61P 65, where starting a good point with 13/7 13/8 is worth the risk of a few extra shots over 13/2. This rule covers 114 cases plus one substitution and one exception. The lone exception occurs when Opener plays the rare 43U and you roll a 65 (Position 9). 24/18 13/8 is .02 better than the normal 24/13, strongly duplicating Opener's aces, and giving you more ammunition up front for a subsequent attack. (Since the focus of this section is to introduce the rules of the system, this will be the last exception to be covered here. All the exceptions are covered in the next section. 2A. Forgo making your 3 point in order to hit loose on your 5 point. (43S, 43U, 54S) 53: 13/5*These are the only positions that forgo a Natural (other than hitting outside as in rule 1): Better to fight for your 5 point than make the weaker 3 point. See Position 10 (43S 53). |
Position 9. 43U 65: 24/18 13/8

Position 10. 43S 53: 13/5*
3. Hit Inside: Hit loose on your 5 and 4 points.These points are too important not to fight for. 3A. With your other checker: Hit again on your 5 and 4 points (but do not break your 8 point), play from your Mid, or from your 24 point.This describes what to do with your other checker: Hit again on 5 or 4 points if possible (without breaking your 8 point), play from the Mid, or play from the 24 point – in that order. Hitting again can only happen after 43U, as shown in Position 11 (43U 21). In all other cases you’ll want to play the other checker down, such as in Position 12 (54S 41). If your other number is a blocked ace, play it from the 24 as in Position 13 (32S 21). 3B. After Opener plays 43U, hit from your Mid rather than expose additional blots. 43U (62, 63): 13/x*This covers two particular cases where instead of hitting and then playing down, you can hit the other checker from the Mid exposing fewer blots. See Position 14 (43U 62), where 13/5* is obviously better than 13/7 6/4*, which rule 3A would suggest. 3C. Forgo hitting on your 4 point with 64. (43U, 43Z) 64: Covered under 64 rule.Never play 8/4* as part of a 64. How do you play your 64 rolls? That’s covered two rules down. |

Position 11. 43U 21: 6/4* 6/5*

Position 12. 54S 41: 13/9 6/5*

Position 13. 32S 21: 24/23 6/4*

Position 14. 43U 62: 13/5*
4. Ace-X: Slot aces (21, 41, 51) after Opener slots or plays down, otherwise split. (Slot if ace-split is blocked by 64P.)This should make sense: you want to slot aces with 6/5, but not after Opener has split (leaving a double direct), or after Opener has made a point (increasing the cost of being hit). So you should slot in Position 15 (32D 51), but not in Position 16 (32S 51) or Position 17 (53P 51). (After Opener runs, splitting and slotting are often close, with a few cases going each way. Splitting as a rule against an opening run minimizes substitutions and exceptions.) 4A. Hit twice inside with the same checker only with 41 after an ace-split from Opener. (21S, 41S, 51S) 41: 6/2*/1*The only third option after splitting or slotting: Hit twice inside with the same checker after Opener splits with an ace, as in Position 18 (21S 41). Note that this is the only occasion to hit twice inside with the same checker. |

Position 15. 32D 51: 13/8 6/5

Position 16. 32S 51: 24/23 13/8

Position 17. 53P 51: 24/23 13/8

Position 18. 21S 41: 6/2*/1*
4B. Treat Opener’s 21$ as a virtual point; split against it. 21$ (21, 51): 13/x 24/23.This covers a set of two special cases: Opener slots with 21 and you fail to hit (21, 51). Since the slot is so likely to be covered, and since the slotted point is so strong, you should just consider the point as made and split against it. 4C. Avoid direct shots in your outfield – play from the rear. (52S, 32Z) 41: 24/20 24/23; 62R 21: 24/21This covers a set of three special cases: Opener splits or runs such that your natural play would leave a direct shot in your outfield. Alternate methods are called for, as in Position 19 (32Z 41). The normal 24/23 13/9 exposes a direct shot on the 9 point, so the unusual 24/20 24/23 is best. This theme comes up again in the next rule. 5. Six-X: Split with 62 and 63. With 64, hit on your 3 point if possible, else Point.These are the default actions for your 6x replies. Many players miss the hit on the 3 point with a 64, as in Position 20 (52S 64). |

Position 19. 32Z 41: 24/20 24/23

Position 20. 52S 64: 13/3*
5A. Run after Opener slots or makes the Bar point.The idea is that splitting to Opener’s Bar would leave too many numbers that both hit and cover, as in Position 21 (41$ 63). And splitting is impossible, of course, once Opener makes the Bar. 5B. Run past Down. Run past a fortified 8 point (62, 63 only).Run past Down means run to the outfield instead of splitting if you can get past both the checkers that were brought down by the Opener, as in Position 22 (43D 64). Running past only one checker would leave a double-direct shot with few returns, so play the normal split as in Position 23 (52D 62). Additionally, with 62 and 63 you should run past splits that fortify (bring an extra checker to) the 8 point, as in Position 24 (52S 63). The idea is that when the 8 point is fortified, hitting 8/7* comes at less cost than usual to Opener since it no longer strips the 8 point. So hanging out on the Bar is less appealing to you. (This does not apply to your 64 since the normal play of pointing with 8/2 6/2 will be even more attractive in those cases when Opener splits.) |

Position 21. 41$ 63: 24/15

Position 22. 43D 64: 24/14

Position 23. 52D 62: 24/18 13/11
Position 24. 52S 63: 24/15
5C. Avoid direct shots in your outfield by slotting. (62R, 63R) 62: 13/5; 62R 63: 24/21 13/7Consider Position 25 (62R 62). The normal split (24/18 13/11) would expose a direct shot on the 11 point, so the unusual 13/5 is called for. Similar to rule 4C above. 6. Others (32, 43, 52, 54). Down after Opener plays down or makes the 2 point, otherwise split. (Z with 43; Down if S/Z are blocked.)The general idea is that after Opener plays down, bringing more ammunition into play, you don’t want to invite an attack by splitting. Instead, play down as well, as in Position 26 (32D 43). When Opener does most anything else (splitting, slotting, running, pointing), you want to split, if possible. The only other case where playing down is called for is when Opener starts with the anti-positional 64P. Then splitting would again invite an attack, so down is best. See Position 27 (64P 43). Finally note that 24/21 13/9 (Z) is always the preferred split with 43, as in Position 28 (65R 43). |

Position 25. 62R 62: 13/5

Position 26. 32D 43: 13/9 13/10

Position 27. 64P 43: 13/9 13/10

Position 28. 65R 43: 24/21 13/9
6A. Slot your 4 point with deuces after weak slots from Opener (51$, 62$); play other number down.Here’s a play that not many know. Slotting the 4 point is generally not as attractive a proposition as is slotting the 5 point, since it carries much the same risk for a lesser reward. However, when Opener slots his own 5 point the play gets some added value by duplicating the Opener’s 3s. That added value is proportional to how much the Opener needs 3s to cover his 5 point. If he opens with 21$ or 41$ he has lots of ways to cover and the duplication is diluted. But when he opens with 51$ or 62$ he has fewer ways to cover and the duplication is effective. So slot your deuces (52, 32) after the Opener’s weakest slots (51$, 62$), as in Position 29 (51$ 52). 6B. After Opener splits with 6x, hit 6/1* with 5s (52, 54). Split other checker.This well-known play breaks communication between Opener’s two back checkers. See Position 30 (62S 52). |

Position 29. 51$ 52: 13/8 6/4

Position 30. 62S 52: 24/22 6/1*
6C. Hit on your 3 and 2 points with 32 and 43 (not 52 or 54). Split with other checker (play down after 52S).Many players miss these hits, such as Position 31 (41S 43). Split with the other checker unless the opening roll is 52S in which case play down, as in Position 32 (52S 43). |

Position 31. 41S 43: 24/21 6/2*

Position 32. 52S 43: 13/9 6/3*
|
These six rules cover every Non-Double opening reply (404 best plays, 29 substitutions, and 17 exceptions. A summary table is provided in the Appendix. On to the doubles. Doubles1. Aces :Play 8/7(2) 6/5(2).Make the two strongest offensive points. This is the default play; alternatives are covered below. 1A. After any (non 6x) split from Opener, play 24/22 6/5(2).After Opener splits with, say, 41S, the default play would leave a direct shot on the 8 point. So play 24/22 6/5(2) instead, as in Position 33. Less obvious are the cases where Opener splits to your 5 point, as in Position 34 (54S 11). Now making the Bar won’t leave a direct shot since Opener will be on the roof after 6/5*(2). Still, splitting is correct. Opener is unlikely to re-anchor on your ace point, so making the Bar is diminished in value, and not worth the five fly-shots. |

Position 33. 41S 11: 24/22 6/5(2)

Position 34. 54S 11: 24/22 6/5(2)
1B. If there is a blot to hit on your 4 point, play 6/4*(2). (32S, 43U, 43Z)See Position 35 (32S 11). 2. Deuces: Play 13/11(2) 6/4(2).Make the two strongest offensive points. 2A. After Opener makes a point or plays down, play 24/22(2) 6/4(2). (13/11(2) 6/4(2) if blocked with 53P)After Opener improves offensively, give some attention to defense, as in Position 36 (43D 22). |

Position 35. 32S 11: 6/4*(2)

Position 36. 43D 22: 24/22(2) 6/4(2)
2B. Hit blots on 20 or 9 points, along with 6/4(2).See Position 37 (41$ 22). 3. Treys: Play 24/21(2) 13/10(2).In contrast to Aces and Deuces, Treys give you the option of making a good advanced anchor while also improving offense. That’s the default, though other plays can be called for, as covered below. 3A. Play 8/5(2) 6/3(2) if hitting on 5 or 3 points, or after Opener runs.No need for defense if you can hit and make two strong points. Nor when Opener has run and made no offensive development, as in Position 38 (62R 33). 3B. Play 13/7*(2) after 6-X split from Opener.See Position 39 (62S 33). Trying for more with 13/7* 8/5(2) is correct at Gammon Go, but not for Money. 3C. Play 24/21(2) 8/5(2) after slot or down from Opener.Many players overlook the tactical 24/21(2) 8/5(2), but it is called for when Opener has played Down or Slot, as in Position 40 (21$ 33). Your blot on the 8 point is less a liability than it first appears, given the opposing blots and your stronger board. |

Position 37. 41$ 22: 24/20* 6/4(2)

Position 38. 62R 33: 8/5(2) 6/3(2)

Position 39. 62S 33: 13/7*(2)

Position 40. 21$ 33: 24/21(2) 8/5(2)
4. Fours: Play 24/20(2) 13/9(2).The default play works on both offense and defense. 4A. Point on blots on your 5 or 4 points (with 24/20(2), if possible).See Position 41 (32S 44). 4B. Hit two blots if possible (not on your Ace point). Cover an inner blot or play 13/9(2) with your remaining moves, if any.See Position 42 (41S 44). The first three moves are used to hit on the 16 and 2 points. The final move covers the inner blot. |

Position 41. 32S 44: 24/20(2) 8/4*(2)
Position 42. 41S 44: 24/16* 6/2*(2)
4C. Hit blot on 16 point with 13/9(2).See Position 43 (54D 44). |

Position 43. 54D 44: 24/16* 13/9(2)
5. Fives: Play 8/3(2) 6/1(2) if hitting on 3 or 1 points, otherwise 13/3(2).6. Boxes: Play 24/18(2) 13/7(2). (13/7(2) 8/2(2) if blocked by 61P).These six rules cover every Double opening reply: 164 best plays, 7 substitutions, and 9 exceptions. A summary table is provided in the Appendix. ExceptionsThe rules above will give you a solid foundation for the opening replies. But you’ll still make some mistakes. (Some 26 of them, to be exact.) It might be time to learn the exceptions. Here are all 26, including the two that were already discussed. Once again, Non-Doubles and Doubles are considered separately. Non-Doubles: 17 Exceptions1. Hit Outside (1)Exception 1 (41$ 43): Rule 1B suggests playing from the Mid with the second checker after hitting from the rear. In this case, however, the imminent blot-hitting contest means that anchoring is a higher priority than building. 2. Naturals (1)Exception 2 (43U 65): The only (non-hitting) exception to a Natural. In reply to the rare 43U, split for better outfield coverage and more ammunition for your subsequent attack. Note the significant duplication of Opener's aces that either hit or anchor. |

Exception 1. 41$ 43: 24/20 24/21

Exception 2. 43U 65: 24/18 13/8
3. Hit Inside (2)Rule 3A suggests bringing a second checker down from the Mid after hitting from the 8pt. Here are two cases where the 4 is better played 24/20: Exception 3 (43S 43): Coming up puts pressure on the outfield blot and duplicates Opener's 5s. Exception 4 (43U 43): Playing down would expose a direct shot. |
Exception 3. 43S 43: 8/5* 24/20

Exception 4. 43U 43: 8/5* 24/20
4. Ace-X (4)Rule 4 suggests splitting aces, unless after an opening slot or down. Here are three exceptions when you roll a 21. (Note that 21 is the most slottable of your aces -- the only one that should be slotted in the opening: Exception 5 (61P 21): Stick writes, "If you split, how will you play your Sixes?" Exception 6 (65R 21). One reason to split after an opening run is to create more hits when the advanced checker can't find safety. But that doesn't apply when the advanced checker has already found safety. Also note that Opener’s subsequent 41 hits, but leaves an awkward ace. Exception 7 (51S 21): A hard position. You don't really want to split against a stacked position that is hoping to attack. But you don't want to slot into a double-shot. Best is the unusual 24/21. Close behind is 13/11 6/5, which, depending on your opponent's expressiveness, may confer significant entertainment equity. |
Exception 5. 61P 21: 13/11 6/5

Exception 7. 51S 21: 24/21

Exception 6. 65R 21: 13/11 6/5

Exception 8. 64R 41: 13/9 6/5
|
Exception 8 (64R 41): Rule 4 suggests splitting, but slotting is best in this case. Note that the outfield blot has both sixes and aces to find safety, so there is diminished utility in splitting to maximize hitting chances. 5. Six-X (4)A trio of cases where making the deuce is not correct: Exception 9 (31P 64): The worst time to make a deep point is when you're getting primed. Exception 10 (43Z 64): As above, avoid making your 2 point when you're in danger of being primed. (43S 64 provides an illustrative contrast: Opener has fewer good priming rolls, so making the deuce is best.) Exception 11 (63R 64): Of all the opening runs, this outfield blot will have the hardest time finding safety. 65 is already safe, 64 has both aces and sixes, and 62 gets hit with your 64. So this is the opening run against which you should play for contact. |

Exception 9. 31P 64: 24/14

Exception 11. 63R 64: 24/18 13/9

Exception 10. 43Z 64: 24/14

Exception 12. 21$ 62: 24/18 13/11
|
Exception 12 (21$ 62): Rule 5A suggests running after an opening slot. But here that would mean running into a double shot with no duplication. 6. Others (5)Rule 6 suggests playing down after an opening down, otherwise split. Here are three exceptions when you roll a weak 52: Exception 13 (32D 52): You will be at a significant priming disadvantage after playing down, so split to maximize anchoring / hitting chances. Exception 14 (43D 52): You will be at a significant priming disadvantage after playing down, so split to maximize anchoring / hitting chances. Exception 15 (65R 52): In contrast to the above, splitting won't help you hit blots that aren't there. Instead, cover the outfield to hinder the last checker's escape. |

Exception 13. 32D 52: 13/8 24/22

Exception 15. 65R 52: 13/8 13/11
Exception 14. 43D 52: 13/8 24/22

Exception 16. 64R 43: 24/20 13/10
|
Exception 16 (64R 43): An early 43 usually plays better as a reverse-split (24/21 13/9) than as a standard split (24/20 13/10). This case is a tactical exception. Your blot on the 10 point is vulnerable to a 54, which already plays well by making the opposing 9 point. And when your blot on the 10 point is hit, you have 5s to anchor and 3s and Aces to hit back. If your blot is on the 9 point, you have 4s to anchor and 2s and 4s to hit back. Exception 17 (51S 43): Rule 6C suggests hitting 6/2* 24/21. But it's not so important to take away half a roll after a weak 51S." |

Exception 17. 51S 43: 24/20 24/21
Doubles: 9 Exceptions
|

Exception 18. 64S 22: 24/16*

Exception 19 41S 22: 2422(2) 6/4(2)
|
Two exceptions to Rule 2A where you don't need to make the defensive play after an opening down or point: Exception 20 (52D 22): The weakest opening down.
Exception 21 (61P 22): The weakest opening point. (Well, the weakest opening Natural point. 64P is weaker, but there you get value from anchoring in front of Opener’s now dead checkers.) |

Exception 20. 52D 22: 13/11(2) 6/4(2)

Exception 21. 61P 22: 13/11(2) 6/4(2)
2. Treys (4)The default treys play is 24/21(2) 13/10(2), unless responding to an opening run, down or slot. Here are the two exceptions: Exception 22 (63R 33): Of course you hit on the 10 point. The 3 point is the best remaining option, unstacking without breaking a point. Exception 23 (65R 33): The usual play after an opening run is 8/5(2) 6/3(2), focusing on offense while Opener has blots to clean up. But this is the only run that doesn't leave blots, so the default play is best. |

Exception 22. 63R 33: 13/10*(2) 6/3(2)

Exception 23. 65R 33: 24/21(2) 13/10(2)
|
Rule 3C suggests 24/21(2) 8/5(2) after an opening down. Here are the two exceptions: Exception 24 (52D 33): The weakest opening down. The 21 anchor does not contest any outfield blots. Go ahead and take the offensive lead. Exception 25 (54D 33): This play doesn't show up anywhere else. What's the story? Perhaps the 2-squeeze: After you make the 3 point, Opener's normal 24/22 and 6/4 are blocked. And none of the remaining options (8/6, 9/7, 13/11) are at all appealing. As a result, subsequent rolls 23, 24, and 25 all play terribly. |

Exception 24. 52D 33: 8/5(2) 6/3(2)

Exception 25. 54D 33: 24/21(2) 6/3(2)
4. Fours (1)Exception 26 (64S 44): Rule 4C suggests hitting 24/16* with 13/9(2). Best is 24/16*(2), though it's fairly close. Your 9 point goes down in value when Opener is likely to make his bar. Memorize this position along with 64S 22 -- both exceptions involving unusual hits with doubles after 64S. |

Exception 26. 64S 44: 24/16*(2)
FlashBackI trust that going over the rules and exceptions has given you some new ways to think about the opening replies. Coming up with the rules certainly changed the way I look at them. But if your goal is optimal performance over the board, a little more work is required. You’ll need to know the combined thirty-eight rules and sub-rules, apply them correctly to normal positions, memorize the twenty-six exceptions, and you’ll want to practice enough to be quick and confident in all cases. You can do this on your own, but I know a better way . . . |

|
FlashBack is a tool designed to help you memorize backgammon positions. It runs on Android, iOS, or desktop (Windows, macOS, Linux) so it’s always within reach. Here’s how it works. Each card shows a question. Tap on the question to see the answer. Choose Hard, So-So, or Easy to rate the card. Cards you rate as hard will be shown again more often than cards rated as easy, concentrating your practice on the material you most need. Here’s that process in more detail, specific to the Non-Doubles Opening Replies. First we’ll cover how FlashBack can help you learn the six rules (and sixteen sub-rules) to your satisfaction. Then we’ll go over how to use FlashBack to master the 433 “normal” positions that the rules cover. We’ll conclude by looking at how to study the seventeen exceptions. RulesExpand the Opening Replies set and select the deck called Non-Doubles (Rules). Tap Browse at the bottom of the screen. You will be shown a flashcard – one of the 6 rules for Non-Doubles. Tap on the question and the answer will show below. |


|
If your memory of the answer was clear and correct, tap Easy. If not, tap So-so or Hard. Flashback will keep track of your answers and show you the cards you most need to see. Your first few times through the deck, limit your focus to just the top line. Once you’re solid on all six basic rules, start absorbing all the sub-rules. Keep working until you achieve a reasonable level of comfort. Perfection is not required: you’ll get lots more practice in the next step, applying the rules to actual positions. PositionsWhen you feel ready, go back to the home screen and de-select Non-Doubles (Rules) and select Non-Doubles (Positions). Tap Browse, and you will be shown a card like the one below. |
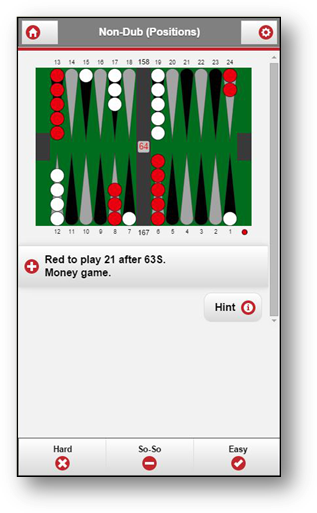

|
This card shows the position 63S 21. Tap on the question to reveal the best play: 13/11 8/7* (Hit Outside). If the answer is unclear to you, tap the Hint button for more information (including much of the content of this article.) FlashBack always displays the best play up top, with plays below ranked in order of equity. Equities of plays within .01 are shown in black. Equities off by more than .01 but less than .1 are shown in green. Mistakes greater than .1 are shown in red. Click on any play to see the resulting position on-screen. Practice this deck, along with the Non-Doubles rules, until all the cards make sense and the patterns flow naturally. ExceptionsThe next step is to master the exceptions. Deselect Non-Doubles (Positions) and select Non-Doubles (Exceptions). Now you will see the seventeen cards that don’t fit the rules. Make sure you can identify the appropriate rule for each card, and train yourself to memorize the exceptional plays. A full list of the exceptions can be found in the Hint section for the Replies decks. Finally, and most important, select both the Non-Doubles (Positions) and the Non-Doubles (Exceptions) decks. FlashBack will show you positions from each deck, all mixed together, just like they occur over the board. You’ll know you’re ready when the exceptions stand out immediately from the rest of the pack. And then you can restart the entire process for the Doubles. While the system developed in this paper takes the simplifying shortcut of allowing substitutions, the flashcard data is all accurate and unabridged. For example, the card below shows the answer given for (61P 43). Rule “Others” suggests 24/21 13/9, but that play is a substitution – 24/21 24/20 is actually .003 better. Note that FlashBack displays the correct play up top, and also shows that the substitution is within the .01 margin of error. Color coding helps make this clear – the equities of plays within .01 are shown in black. You will always see the best available data, and can decide for yourself whether to tackle the substitutions. |

|
But suppose you don’t care for these rules, substitutions, or exceptions in the first place. Perhaps you already know most of the replies, and just want to drill them without the overhead of any “system.” FlashBack is still the right tool for the job. Simply ignore the Rules decks, and combine the Positions and Exceptions decks. Now you can train with the complete set of Opening Replies, system be damned. FlashBack is a free download for Android, iOS, or desktop, and comes with pre-installed decks for the Opening Roll (money and match play), Two- and Three-Checker Bear-offs, Long and Short Races, Match Equities, Take Points, Trice's Boot Camp, Woolsey's Encylopedia Vol 1, as well as The Opening Replies. The Opening Replies set includes: Non Doubles (Rules), Non Doubles (Positions), Non Doubles (Exceptions), as well as Doubles (Rules), Doubles (Positions), Doubles (Exceptions), as well as all of the Opening Replies at DMP, GG, and GS, for well over 2500 positions. Available now, for free, right here. Studying the Opening Replies using this system and FlashBack has dramatically improved my game. I hope it helps yours. AcknowledgementsWarm thanks to David Levy, Paul Weaver, Simon Woodhead, Christopher Yep, and MCG. Your comments were strikingly helpful and amusingly non-overlapping. |
Appendix: Summary TablesNon-Doubles
Doubles
| |||||||||||||||||||||||||||||||||||||||||||||||||||||||||||||||||||||||||||||||||||||||||||||||||||||||||||||||||||||||||||||||||||||||||||||||||||||||||||||||||||||||||||||||||||||||||||||||||||||||||||||||||||||||||||||||||||||||||||||||||||||||||||||||||||||||||||||||||||||||||||||||||||||||||||||||||||||||||||||||||||||||||||||||||